Wednesday, December 30, 2009

Recipe: Cinnamon Chip Scones


Our daughter loves scones so I ripped this recipe out of Simple and Delicious magazine (Nov/Dec 2007 issue pg. 12) to try. I'm not a fan of scones because I always thought they were dry and thick - these were moist, flakey and soooo good! (um... if I do say so myself!).

They were so easy to make that I made 2 batches and sent some hot out of the oven to all my neighbours. It snowed 3" last night so it seemed like a perfect day to send such a treat!

Be patient when you knead these as you'll initially think "these will never come together". After about 10 kneads the dough starts to turn into a nice ball and is easy to work with. I used my kitchen table as I needed lots of room to knead this huge batch of dough.

You can find this delicious Cinnamon Chip Scones recipe here.


Friday, December 18, 2009

Recipe: Sausage-Sauerkrat Soup (Slow Cooker)


This soup has a sweet and sour flavour which comes from the saurkraut and vinegar. It's delicious and tastes even better reheated. I cooked this up in the slow cooker when my mother-in-law arrived for the holidays from Maryland.


From "Biggest Book of Slow Cooker Recipes Volune 2" page 194


SAUSAGE-SAUERKRAUT SOUP

Longtime old-country favorites - sausage, potatoes, and sauerkraut - are stars in this soup.


4 cups chicken broth

1 14- to 16-oz can sauerkraut, rinsed and drained

12 ounces cooked Polish sausage, chopped

1 10-3/4 oz can condensed cream of mushroom soup

8 oz fresh mushrooms, slices

2 medium carrots, chopped

2 medium stalks celery, chopped

1 medium potato, cut into small cubes

1 medium onion, chopped

2 tablespoon vinegar

2 teaspoons dried dill

1/2 teaspoon black pepper

2 slices bacon, crisp-cooked, drained, and crumbled (optional)


1. In a 4- to 5-quart slow cooker stir together broth, sauerkraut, Polish sausage, cream of mushroom soup, mushrooms, carrots, celery, potato, onion, vinegar, dill, and pepper.


2. Cover and cook on low-heat-setting for 10 to 12 hours or on high-heat setting for 5 to 6 hours.


3. If necessary, skim off fat before serving. If desired, sprinkle individual servings with bacon.


Enjoy! Submitted to Finer Things Friday over at Amy's Finer Things.

Thursday, December 17, 2009

Recipe: Chocolate Cookie Bark


How can I describe how good this bark is? Like most holiday treats is terrible for you but oh so good! It has a bit of a crunch from the Oreo cookies and is wonderfully sweet and tastey with white and dark chocolate and peanut butter.. need I say more :)

My husband said 5 people approached him at work this week asking him when he'd be bringing some in. I was very flattered and laughed as the recipe takes less than 10 minutes to prepare with no oven or anything! I've made this a number of times and it's great for bake sales as it sells fast.

The original recipe is from the Kraft Canada Foods website here which even includes a downloadable gift tag. There's even a YouTube video from Kraft Canada to show you exactly how to do it here!

Below is my slightly modified version. In lieu of the Oreo's you could really use any type of cookies or nuts. I've made it with sliced almonds and it worked well.

CHOCOLATE COOKIE BARK

1 bag of dark chocolate chips
1 box of white chocolate
10 crumbled Oreo cookies
2 Tbsp. peanut butter (smooth or crunchy)

~ Break up Oreo cookies into a bowl and set aside.

~ Place dark chocolate chips into a bowl and microwave 45 seconds, stir, microwave for another 45 seconds and carefully remove hot bowl from microwave. Stir. Mix in half of the crumbled Oreo cookies.

~ Place white chocolate squares into a bowl and microwave 45 steconds, stir, microwave for another 45 seconds and carefully remove hot bowl from microwave. Stir. Add to melted chocolate 2 Tbsp. of peanut butter and stir. Mix in the last half of the crumbled Oreo cookies.

~ Drop each bowl of chocolate by spoonfuls onto parchment (not wax) paper covered cookie sheet. Take knife and glide it through the chocolate to create the marble effect and spread out the chocolate a bit.

~ Put into fridge for at least and hour then break into bite sized pieces and place in wax lined, air-tight container.

That's it! Happily submitted to Ultimate Recipe Swap over at Life As Mom - check out with other Mom's have submitted to this great swap of Holiday Desserts!

Monday, December 14, 2009

Dr. Bonner's Soap - What is it?


I haven't been blogging much lately as it seems I've been fighting a sinus infection since before Thanksgiving. I went through my first round of antibiotics and am dreading taking more so I've resorted to taking probiotics twice a day instead. I'm holding the infection back some but it's a long recovery :(

Okay, enough about me! I found this "wonder product" at Target yesterday. I've read about Dr. Bonner's on different blogs and websites and was curious about it. According to their website this all-vegetable based castile soap can be used for many things including body wash, all purpose cleaner, laundry soap, even tooth-brushing!
I searched a couple of my favourite blogs to see how others use Dr. Bonner's Castile Soap and what they've found it's good for.
I found a number of tried and true uses over at Keeper of the Home (such a wonderful blog). Here's Amanda's links for shampoo, cloth diapers, eczema, cleaning and more - wow!
I'll try this soap over the holidays and will report back how it worked out. I have to admit, it's a little intimidating as the instructions on the bottle (I mean look at how much writing is all over it!) are not clear and I'm sure it'll take some trial and error.

Here's a link to the Dr. Bonner's website FAQ's.

My goal, as with many things this year, is to go more natural and chemical-free in the products my family uses - without spending a fortune! This bottle was around $8.00. It's not easy figuring out "natural living" and making it work for me as there's so much information out there and so many conflicting reports.
Has anyone out there ever tried this product?

Wednesday, December 2, 2009

Friends of Martha Blog Network


I am now a new memeber of the Friends of Martha Blog Network! I adore all things Martha and can only hope to be a teensy bit as accomplished as her.

I remember watching her Living show back in the 90's and being facinated by her. I also remember watching her new show Martha! after work and cooking supper when it was on - how inspiring! When I became a stay-at-home mom watching Martha! during our son's naptime. Hey, if you're going to watch something on TV you might as well learn something right?

I've subscribed to Martha Stewart Living magazine for many years and can't bear to give them away or clean them out. I even have them sorted by the seasons (Halloween, Thanksgiving, Christmas, etc.), because I'll look thru them again and again.

I've also had a subscription for Everyday Food magazine for years and have these sorted by the season as well. This way when I'm looking for something new to try with seasonal ingredients there's always a great recipe in there to try. Some of my copies have so many Post-it flags for favourite recipes hanging off the side of the magazine that it won't sit properly on my shelf!

I love her books and have them proudly displayed in my kitchen. I can't say I use them much as I'm actually afraid of getting them dirty. Martha would gasp at the thought of this as she loves her books to be used. I'll keep trying but I hate to even crack open the spine of these fine books.

Our 8 year old daughter loves Martha as much as I do. She watches the recorded shows we have on our DVR, loves to look through the Living magazines, and even dressed up as Medusa for Halloween after watching Martha's Halloween special last year where she was dressed as Medusa.

So, I came across a great blog the other day Martha and Me and saw on her sidebar the Friends of Martha Blog Network. My mind started to swim - even I could be a friend of Martha's! Go have a look at all the bloggers who also love to write about everything Martha. I'm not paid or anything to be on this network. It's just a great place to share our interest in all things Martha Stewart.
Below is a little decorating trick I picked up from Martha, to place all like dishes together for a pretty display! For more inspiration on cooking, homemaking, decorating, crafting and so much more go visit the Friends of Martha Blog Network - enjoy!


Monday, November 30, 2009

Recipe: Curried Chicken Fricassee


After all that turkey and comfort food we've been having lately, this dish was a nice change of pace. It smelled wooonnddeerrffuull while it was cooking and was delicious! This is my own modified version of a recipe I found in a magazine (I modified it so much that I guess I can call it my own!).


CURRIED CHICKEN FRICASSEE

8 chicken thighs (about 2.5 pounds), with skin, bones in

1/2 tsp. coarse salt

1/4 tsp. freshly ground black pepper

2 Tbsp. extra virgin olive oil

1 Tbsp. curry powder

2 tsp. Tastefully Simple Green Tea Peppercorns

1-1/2 Tbsp. fresh rosemary, chopped

1-1/2 Tbsp. fresh thyme, chopped

3 medium onions, chopped

5 cloves garlic, crushed

1 cup white wine

4 cups chicken broth

8 oz. frozen petite peas

Serve over brown rice


1. Wipe the chicken thighs dry; season with salt and black pepper. Heat olive oil in a deep stockpot or Dutch oven over medium-high heat. Place chicken (skin iside down) in the pot and cook 6 to 8 minutes, until skin is golden brown. The chicken will give off a lot of it's own fat. Add curry power, green tea peppercorns, and herbs sprinkling evenly over chicken. Stir it around to mix it up.


2. Turn chicken with tongs and continue cooking. Scrap bottom of pot with wooden spoon to loosen the skin off the bottom if it's stuck. After 5 minutes, add onions and continue cooking about 4 minutes, stirring occasionally. Deglaze the pan by adding garlic and wine just enough time to lose its acidity. Add enough broth to cover the chicken, about 4 cups. Bring to a boil over medium-high heat, then cover the pot and reduce heat to a simmer.


3. Cook slowly, 1-1/2 hours. Prepare rice (I used organic brown long-grain rice which takes 40 minutes). Cook peas and set aside.


4. Remove chicken and keep warm. Reduce the sauce over high heat until thickened (10 to 12 minutes), season to taste, (hubby suggested I add a bit of corn starch next time to thicken the sauce). Layer rice, then peas, then chicken, then sauce and enjoy!


Wednesday, November 25, 2009

Happy Thanksgiving

Happy Thanksgiving Everyone! This is a picture of our fest a couple years ago.


Our family will be travelling to visit our closest relatives this holiday. We're thankful to have family close enough to drive to as my family is over 4000 miles away and husband's 2000. It can be tough living away from your mom, dad, siblings, and cousins but this is where life (and my husband's job) has placed us. I am thankful that he is still employed in this tough economy and see the effects of it all around me in our community.


I found a beautiful Thanksgiving Prayer to share which is from The Lutheran Church - Missouri Synod website.

This morning I asked our daughter to make a list of what she's thankful for (I typed it as she wrote it, spelling mishaps and all ;o)

I am thankful for...

My family, My cosins, My voice, halloween, dressing up, My friend's, My dog, Christmas, gifts, My hose, My little brother, My playhose, My blow up slide, and our freedom.

I hope you all have a safe and blessed Thanksgiving holiday.

Tuesday, November 24, 2009

Recipe: Coconut Snowballs


Our daughter had 4 friends over on Saturday so I needed to find something to keep them busy and the girl drama down! So, I put them to work baking Christmas cookies.
I am a big believer in hosting playdates for our daughter. It's great to have her friends over and get to know them. Each girl is different and special in her own way. She has her friend who's funny, sporty, crafty, and motherly. It's nice to know they're all safe here, and I get to listen to what's going on in their lives.. either through them telling me or through hearing them play.
Kids play out what they're experiencing so hearing them play gives a priceless glimpse into their lives like what their excited about or what's bothering them. We find lots of opportunity to discuss being a good friend to one another and what it means to be a good friend.


Now for the great recipe I found in Family Circle's Nov 29 '08 magazine! I love this magazine's articles and recipes. I'm a magazine nut and have piles by my computer. When our library is cleaning out old issues I take them home, read them, then pass them on to our adopted soldier serving in Iraq or to other friends.

These cookies literally melt in your mouth. I was never a big fan of coconut but the coconut in these cookies isn't overpowering. They're like a buttery shortbread ball cookie with frosting and a bit chewy. I'll be mailing these to all my family in Canada this week when I send their presents. What a wonderful time of year!


Find a link to the recipe here.

Coconut Snowballs
From Family Circle Magazine Nov.29.2008
Makes: 2 doxen
Bake: 350 for 15 minutes

1 cup sweetened flake coconut
1 cup all-purpose flour
1-1/4 cups cofectionrs' sugar
pinch salt
6 Tablespoons (3/4 stick of butter) unsalted butter, softened
1 teaspoon vanilla extract
4 teaspoons milk
1. Grind 1/2 cup of the coconut in food processor. Chop remaining coconut and set aside. Add flour, 1/4 cup of the confectioners' sugar and the salt. Pulse to blend. Add butter and vanilla pulse until dough comes together.

2. Heat oven to 350. Roll dough into 1-inch balls. Place dough balls 1 inch apart on an ungreased baking sheet.

3. Bake cookies until firm but tender, 15 minutes. Remove to rack; let cool completely.

4. In small bowl, stir together remaining 1 cup confectioners' sugar and enough milk until smooth but still thick. Dip cookies in glaze (about 1/2 teaspoon for each), letting it drip down sides. Dip in chopped coconut and set aside for glaze to dry.

Per cookie: 89 calories; 4 g fat (3 g saturated); 12 g carbs


Happily submitted to Tasty Tuesday over at In Passionate Pursuit. She's posting live from South America today where they're picking up her new nephew! What a wonderful blessing!

Friday, November 20, 2009

Frugal Friday: Holiday Movie & TV Show Listings


Watching holiday movies is a tradition in our home. Once our family flys in for Christmas we watch a movie almost every evening after supper. Last year we watched everything from John Adams, A Christmas Story to ET! This year I'm hoping to find more Christmas themed movies.

I was searching around the internet today (using Swagbucks but I'll post about that later) searching for Holiday TV Movie Schedules. Specifically, I was looking for when the Amercian Girl movies will be on Hallmark Channel. I came across this amazing site "Its A Wonderful Movie" with all listings Holiday shows and movies. It includes reviews, links, descriptions of shows and loads more. What a great site to refer to when you plan on cuddling up with your family to watch holiday shows.

Happily submitted to Frugal Fridays where everyone's submitting their ideas for Planning Christmas on a Budget over at Life As Mom.

Thursday, November 19, 2009

Recipe: Turkey Pumpkin Chili


This Turkey Pumpkin Chili was so delicious and easy to make. It's also packed with vitamins!

I made this for a pumpkin carving party we were supposed to have last month but the party got rained out. So, I froze the huge pot full of chili into individual Ziplock bags and froze it for later. It reheats beautifully and tastes even better! A friend of mine came for lunch last week and she ate two bowls then made it for supper that same night!

The Whole Foods Website is full of wonderful, delicious, easy and nutricious recipies.

Whole Foods Turkey Pumpkin Chili recipe here.

Happily submitted to the Ultimate Recipe Swap at Life As Mom. See the swap links today for lots of Thanksgiving Inspiration!

Wednesday, November 18, 2009

Recipe: Homemade Granola Bars


This recipe is from one of my favourite homemaking blogs that I love to read Home Joys. All of Gina's recipes are simple, nutritious, and made from scratch.


My only tips with this Granola Bar recipe would be to let the bars cool half way before cutting them, let them cool almost completely then take them out of the pan to cool on a rack. I added 1/2 cup raisins and 1/2 cup dark choc chips for some added sweetness. Great snack or for lunch boxes!


2 1/4 cup rolled oats
1 cup sunflower seeds
1 1/4 cup chopped peanuts

Toast oats, seeds, and nuts in 400 degree oven for 10-15 minutes. Check every few minutes and stir them around. You don't want them to burn, only to slightly brown.

2/3 cup honey
1/2 cup brown sugar
2 T butter
2 tsp vanilla
1/2 tsp salt

Melt honey, sugar, butter, vanilla, and salt in pan over medium heat. Simmer for about five minutes.

1 cup raisins

Pour sugar syrup over toasted ingredients and raisins. Stir well. Press into greased 9 x 13 glass pan. Carefully press mixture tightly. Cut into bars while still warm.

Options:
Instead of the sunflower seeds, peanuts, and raisins, you may substitute from this list.

walnuts
almonds
coconut
craisins
chocolate chips (allow to cool slightly before mixing in, or will melt, which tastes good anyway!)
wheat germ
flax seed

Tuesday, November 17, 2009

Parenting: I forgot to be the Tooth Fairy!


Oh my! I'm sure we've had moments like this as parents but it's terrible when it happens to you. I forgot to be the magical Tooth Fairy and collect my daughter's newly lost tooth and place money for it under her pillow.

It's been at least 2 years since she's lost a tooth, she's 8 now and soon the magic of the Tooth Fairy will be long gone. She was sooo excited about her lost tooth and waited with delight for her prize from the Tooth Fairy. She still asks what happens to the teeth she collects and listens with wonder as Daddy weaves a tale of fantasy houses built with baby teeth or her old baby teeth placed in the mouth of a new baby.

So she went to bed, filled with visions of a beautiful Tooth Fairy decending upon her room, then woke up to nothing! Somehow the tooth got lost in her bed but - Mommy also forgot. In the morning we came up with a theory that the dog disturbed her work, baby brother walked in on her in his sleep and more. She went to school satisfied that the Tooth Fairy could complete her work that night.

That day I actually found the tooth while making the bed! I was going to place money under her pillow so that it would be there when she got home from school and FORGOT AGAIN! I wish I could say something important came up last minute that made me forget but it wasn't that... it just slipped my mind in the midst of my daily things-to-do.

After school she wrote the Tooth Fairy a letter and placed it under her pillow to explain the situation. I typed it below just as she wrote it and left out her name*.

To: Tooth Fairy
From: Daughter* (the girl sleeping in the bed)

I have a tooth that I lost. But I have lost it! My mom at first looked in my bed. She found it but she lost it again. I can prove I have a tooth becuse I sleep with my mouth open and you can see it. It is on the bottem row right in frount. You can move my lip if you want to.

Sincerley,
Daughter* (the girl sleeping in the bed)

Isn't she so cute! So, I finally remembered to put money under her pillow last night. I couldn't get the note from under her pillow without waking her - even though she left a place and pencil for the Tooth Fairy to write back.

I will do my best to NEVER forget such an important event again! I am grateful for the forgiveness and understanding of my daughter. Submitted to Gratituesday over at Heavenly Homemakers... go take a look at what others are grateful for!


Saturday, November 7, 2009

Recipe: Basic Bread Techniques


Baking your first loaf of bread can be intimidating. Previously, I wrote about a great no-knead brown batter bread, however, I also wanted to try "the real deal" from scratch. My bread maker was inconsistent with how the bread would turn out and it always seemed too spongy and fluffy for sandwhiches.

The recipe and tips below are detailed and easy to follow. I've made about 20 successful loaves so far so I thought the recipe was worth writing about. I received this recipe years ago from a community center when I lived in Toronto. I now make this recipe as our everyday bread every second day or so... it's that easy!


BASIC BREAD TECHNIQUES

Prepare yeast: Take the yeast you need for your recipe, and sprinkly it on top of war water (105-115F - just a little warmer than body temperature). Water which is too cold won't "wake up" the yeast, and water which is too hot will kill it. If it doesn't seem to be reacting to the water at all, it probably isn't OK to use. Some people add a little sweetener - what you want to avoid at this stage is salet, which will kill the yeast.

Mix the dough: There are several different ways to do this - a simple one which works is mixing together the liquids, using water which is quite warm, adding half the dry ingredients to get a soupy mix, adding the yeast, and then the rest of the dry ingredients, including the salt.
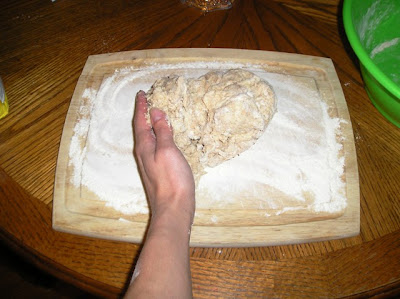

Knead: Put the flour in front of you on a well-floured board. Push down and away on it - use your whole body! Fold it in half, pulling the back over the front. Turn it a quarter and repeat. Keep the board floured - the dough will absorb it. Knead unti lthe dough is elastic, smooth, and a little shiny.

Rising: Put the kneaded dough into an oiled bowl. Cover it with a warm damp cloth and put it in a warm place away from drafts. Let it rise until about twice its original size. It's ready when it collapses quickly when you push into it.


Punch down: Turn the dough back onto the kneading board and push it down, kneading it again a few times.

Proof: Shape the dough into the right size for your pan. Put it in an oiled pan, and put the pan in a warm place and cover it lightly. Let the bread rise until it's about double in size - if it "overproofs" it will collapse or flow over the edges of the pan, and you have to punch it down again. When it is proofed enough gently push with a finger should leave a mark in the dough.

Bake: Put the bread in a preheated (usually 350) oven. It usually takes about 40 minutes to bake. It's done if it sounds hollow when you take it out of the pan and tap on the bottom. Turn it out of the pan and let it cool on the rack.


Basic White or Brown Bread


1/4 cup warm water
1 teaspoon yeast
1 cup hot water
1 tablespoon oil (I use canola)
1 tablespoon honey or sugar
3 cups flour (I use 2 white, 1 whole wheat)
1 teaspoon salt

Put the warm water in a small bowl and spinkle the yeast on top. Put the hot water in a large bowl and add the oil and honey or sugar. Mix in 1 cup flour, then the yeast mix, then the rest of the flour and the salt.

Knead the mix on a floured board, then oil the bowl and put the dough back in. Let it rise in a warm place (I use the microwave) until it is about twice as big. Punch it down, put it in an oiled panand let it rise again. Bake it in a preheated 350 degree oven for about 40 minutes.

Let it cool on a wire rack completely, slice with an electric knife, and place in ziplock bag. Makes 1 loaf, lasts 3-4 days if kept in cool dark place like a bread box.


So, how about you? Do you have any favourite bread recipes? If so, link your recipe in the comments section below and I'll give it a try! Thanks for sharing :)


Thursday, November 5, 2009

Recipe: Pumpkin Muffins


Oh boy these are delicious! They're moist, light and easy to make. Dear son got up extra early this morning so we decided to do some baking in our pajama's.

This recipe is from one of my most loved cook books "All New Complete Cooking Light Cookbook". I don't necessarily love the book because of it's light recipes but because there's lots of delicious recipes all through the book. I took a photo of how many recipes I've flagged as my favourites.

We doubled the recpie and it made 3 dozen muffins which left us lots to package as treats for friends. We have an elderly neighbour in need, a friend home with three children under 3 (one is a preemie so they can't go anywhere), and a teacher who's pregnant. I'm sure they'll all enjoy these goodies :)

I found a copy of the Pumpkin Muffin Recipe on a really great recipe site My Recipes.
Happily submitted to the Ultimate Recipe Swap at Life As Mom... check out everyone's tips on Make Ahead Meals this week!


Tuesday, October 27, 2009

Family Fun: The Muppet Show!


Do you remember The Muppet Show? This is what I asked my 29 year old sister a few weeks ago and she said, "not really". What a shame that she doesn't but I'm 35 and remember it well!

About a month ago I reserved, through inter-library loan, The Best of the Muppet Show with Carol Burnett, Steve Martin, and Gilda Radner. The kids and I had sooo much fun watching this DVD. We're still singing the songs and acting out the skits a month later!

The Muppet Show is good clean silly humour which is great for families. I love the music and am still facinated at how life-like the muppets can be. We all have fun watching it. I don't get the chance to watch much tv, and really have no interest, but this show has me laughing out loud and is well worth it!

I've just reserved, again through inter-library loan, Season 1 of The Muppet Show. Isn't the library great! I'm looking forward to sharing the laughs and silliness with our kids. Anything that brings us together like that is priceless :)

Look at the site I found for fans of the show - Muppet Central. Make sure to check-out the Muppet Wild! site as well which is dedicated to all things Muppets!


I'm also looking forward to visiting The Jim Henson Legacy display at The University of Maryland where he (along with my husband) graduated from.


Wednesday, October 21, 2009

Girl Scouts: Always Be Prepared

I am proud to say that I'm a new 3rd Grade Brownie Girl Scout Leader! We had our first meeting last week and now that I've gotten my feet wet, I'm ready to run with it!

My co-leader, thankfully, is a music teacher and is enthused about helping. We already have our Cookie Mom as well, who's on her 3rd year of doing this. So, you see, with all this support how could I refuse to volunteer?

I firmly believe in the role of Girl Scouts and their Mission Statement sums up nicely why:

GIRL SCOUT MISSION STATEMENT

Girl Scouting builds girls of courage,

confidence and character,

who make the world a better place.

So, off we go with my craft ideas! I'm not a crafter by any means and was, frankly, never that interested. But now that I've got to come up with ideas of what to do, I'm slowly getting "hooked"! I'm even going for coffee with a friend of mine this week so she can show me how to sew some simple stitches that I can teach the girls... you read corretly, I can't even sew a button! :)

Check-out some of the cool craft ideas I saw in Family Fun magazine:


Flower Power (we're gonna pin these one the plain baseball hats I picked-up)


Yarn Painting (how cool is this!)


.. now to just tie these awsome crafts into a badge, hmm maybe I'm doing this all backwards?


I also made a cool (password protected) website for our troop today using http://www.clubspaces.com/. It's free, was pretty easy to set up and now I've got a great place to communicate with the parents.


Cookie sales start soon and it's such a great fundraiser for the troop. Last year the girls troop saved enough money from sales (like over $1000 bucks) to go on an overnight resort waterpark trip. Many of the girls in the troop likely would not have experienced anything like this had it not been for girl scouts. How great is that?
I'll keep sharing all the fun we're having! In the meantime, buy some Girl Scout cookies when they come knockin at your door ;o)

Monday, October 12, 2009

Recipe: Apple Streusel Coffee Cake

It's Bus Driver Appreciation week here so I made two of these delicious cakes to send to the bus barn. I doubled the recipe and made 2 cakes. The recipe below is for 1 cake only.

I wish I had a picture of this cake cut so you could see the delicious center filled with apples and streusel. Hmmm, maybe I'll have to make another this week! This is from another one of my favourite Jean Pare "Company's Coming" cookbooks "Baking - Simple to Sensational" page 104.

Here's a link to the "Company's Coming" website.

APPLE STREUSEL COFFEE CAKE
Tart, apple-flavoured coffee cake with the fragrance of a sugar and cinnamon topping to stir memories and taste buds.
2 Tbsp. white vinegar
1-3/4 cups milk, approximately

SPICY STREUSEL TOPPING
2/3 cup granulated sugar
1/2 cup all-purpose flour
2 tsp. ground cinnamon
1/4 tsp. ground nutmeg
1/4 cup cold butter

CAKE
3/4 cup butter, softened
1-3/4 cups granulated sugar
2 large eggs
1 tsp. vanilla
3 cups all-purpose flour
2 tsp. baking powder
1 tsp. baking soda
1/4 tsp. salt
2 medium cooking apples, peeled, cored and thinly sliced
Measure vinegar into 2 cup liquid measure. add milk to equal 1-3/4 cups. Let stand 10 minutes to sour.

SPICY STREUSEL TOPPING
Combine first 4 ingredients in small bowl. Cut in butter until mixture resembles coasrse crumbs. Makes 1-3/4 cups topping.
CAKE
Beat butter and sugar in large bowl until light and creamy. Add eggs, 1 at a time, beating well after each addition. Add vanilla. Stir.

Combine next 4 ingredients in medium bowl. Add flour mixture to butter mixture in 4 additions, alternatiing with milk mixture in 3 additions, beginning and ending with flour mixture. Spoon 1/2 of batter into greased 9x13" pan. Spread evenly.


Arrange apple slices close together in single layer over batter. Sprinkle about 1/2 cup topping over apples. Spoon remaining 1/2 of batter over top. Spread evenly.
Sprinkle with remaining streusel topping. Bake in 350F oven for about 55 minutes until wooden pick inserted in centre comes out clean. Cuts into 15 pieces.


Friday, October 9, 2009

Frugal Friday: Dial-A-Story


If you haven't heard about this service from your local library yet, you'll be glad that you found it! To access DIAL-A-STORY you simply dial the phone number given by your local library and a recording (a real person not a robot) begins to tell a children's story. This is available 24 hours a day 7 days a week.

I find DIAL-A-STORY especially helpful when we have to take a 20 minute drive into town, or stuck in traffic, if I'm trying to distract our son while I try to complete a task, when our daughter was home sick and bored, or when we're stuck inside on cold and wet days.

You can read more about it here from Parent's Press. Here's the link for those of us in Kansas from the Kansas City Public Library DIAL-A-STORY 816.701.3456. Here's another line 208.726.0033 by The Community Library where you can press a code listed here to select the story you want.

If you have unlimited long distance, especially between USA and Canada, just think of all the different story lines you could call! Here's one 416.395.5400 from the Toronto Public Library in Ontario, Canada where you can chose from 12 different language options!

Happily submitted to Frugal Fridays over at Life As Mom (such a great site!).

Wednesday, October 7, 2009

Recipe: Brown Batter Bread


I've done it! I've found a great no-kneed recipe for bread that's easy, healthy, can be easily used for sandwiches and tastes great!


I've been struggling for a while to find a recipe that I can make on a regular basis for our family. A recipe that's fairly quick, not too messy, doesn't involve allot of kneading, and tastes good. Well ladies and gentleman, I've found it in my favourite cookbook by Jean Pare's Company's Coming, Cooking for Two.


BROWN BATTER BREAD

No kneading required. Just the pleasant task of consuming.


1 tsp. Granulated sugar

1 1/4 cups Warm water

1 Tbsp. Active dry yeast


2 cups Whole wheat flour

2 Tbsp. Cooking oil (I used Canola Oil)

2 Tbsp. Mild molasses

1 tsp. salt


1 cup All-purpose flour


Stir sugar into warm water in large bowl. Sprinkle yeast over top. Let stand for 10 minutes. Stir to dissolve yeast.


Add next 4 ingredients. Beat on low to moisten (I just used our hand beaters). Beat on medium-high for 2 minutes.


Work in remaining flour (I used a wooden spoon, then my hands to make it into a ball and combine it all). Cover with greased waxed paper (I used parchment paper) and tea towel. Let stand in oven with light on and door closed for 40-45 minutes until doubled in bulk.


Stir batter down. Spoon into greased glass loaf pan (I don't know why it says stir, I just transferred the loaf ball after stirring it down with a wooden spoon). Cover with greased waxed paper (again I used parchment) and tea towel. Let stand in oven with light on and door closed for 20 minutes until doubled in size or just up to top edge of pan. (I put it in the microwave instead as I wanted to preheat the oven to 375 and have it ready).


Bake in 375 degree oven for 25 to 30 minutes.


Makes 1 loaf. Cuts into 16 slices.

(After letting it cool on the rack for about 30 minutes, I cut it with an electric knife).


I have a bread machine but I can't find a consistent bread recipe and the bread tends to come out too light and airy for sandwiches. Found lots of good dough recipes for the bread maker and I'll post about those soon.


I borrowed Artisan Bread in Five Minutes cookbook from the library but I don't have the suggested stone for baking yet, so I returned the book until I get the right equipment.


I haven't tried the old fashioned type recipe that involves kneading because I simply don't know what I'm doing! The recipe will say something like "kneed until texture is good enough" and I think.. huh? I'll post when I find a good old fashioned recipe.


Our house smells wonderful with all this bread baking going on... mmmm.


Happily submitted to Works for Me Wednesday over at We Are THAT Family (such a hilarious site to read!).


Monday, October 5, 2009

Recipe: Applesauce Bread Pudding


When I was little, bread pudding was one of my favourite desserts. This brings back memories of Sunday family dinners at my Nana and Grandad's. We'd have roast beef dinner with roasted potatoes, then have this for dessert in the den on TV trays and watch Walt Disney at 6pm.


This recipe from Gina @ Home Joys made for a delicious after school snack and kept well enough in the fridge to fill lunch boxes for the week! This is a great way to use left over bread and treat your family!
Applesauce Bread Pudding
In greased 9 inch square pan, arrange4 slices of bread, cubed
Combine:
2 cup applesauce
1/2 cup raisins
1/4 cup brown sugar
1/2 tsp cinnamon
Spread over bread.
Top with4 additional slices of dry bread, cubed
Beat together:
2 eggs
2 cup milk
1/2 cup brown sugar
1/4 tsp saltdash of nutmeg
Pour over bread.
Optional:
Top with 1/2 cup applesauce and sprinkle of cinnamon-sugar.
Bake at 350 for 55-60 minutes.


Sunday, September 27, 2009

Nova Scotia Artist Maud Lewis


I found a good blog article on Nova Scotia artist Maud Lewis. She painted beautiful folk art with oil paints. Her artwork is breathtaking. Maud Lewis lived in poverty and was deformed with arthritis, yet created art her whole life. Read more about her inspiring story here.

I reserved a book on her life from the library today and am going to introduce Maud Lewis to our children. We'll also try our hand at painting her pictures by following the instructions on this great site Art Projects for Kids.
Related Posts with Thumbnails