Showing posts with label Banana. Show all posts

Tuesday, December 7, 2010

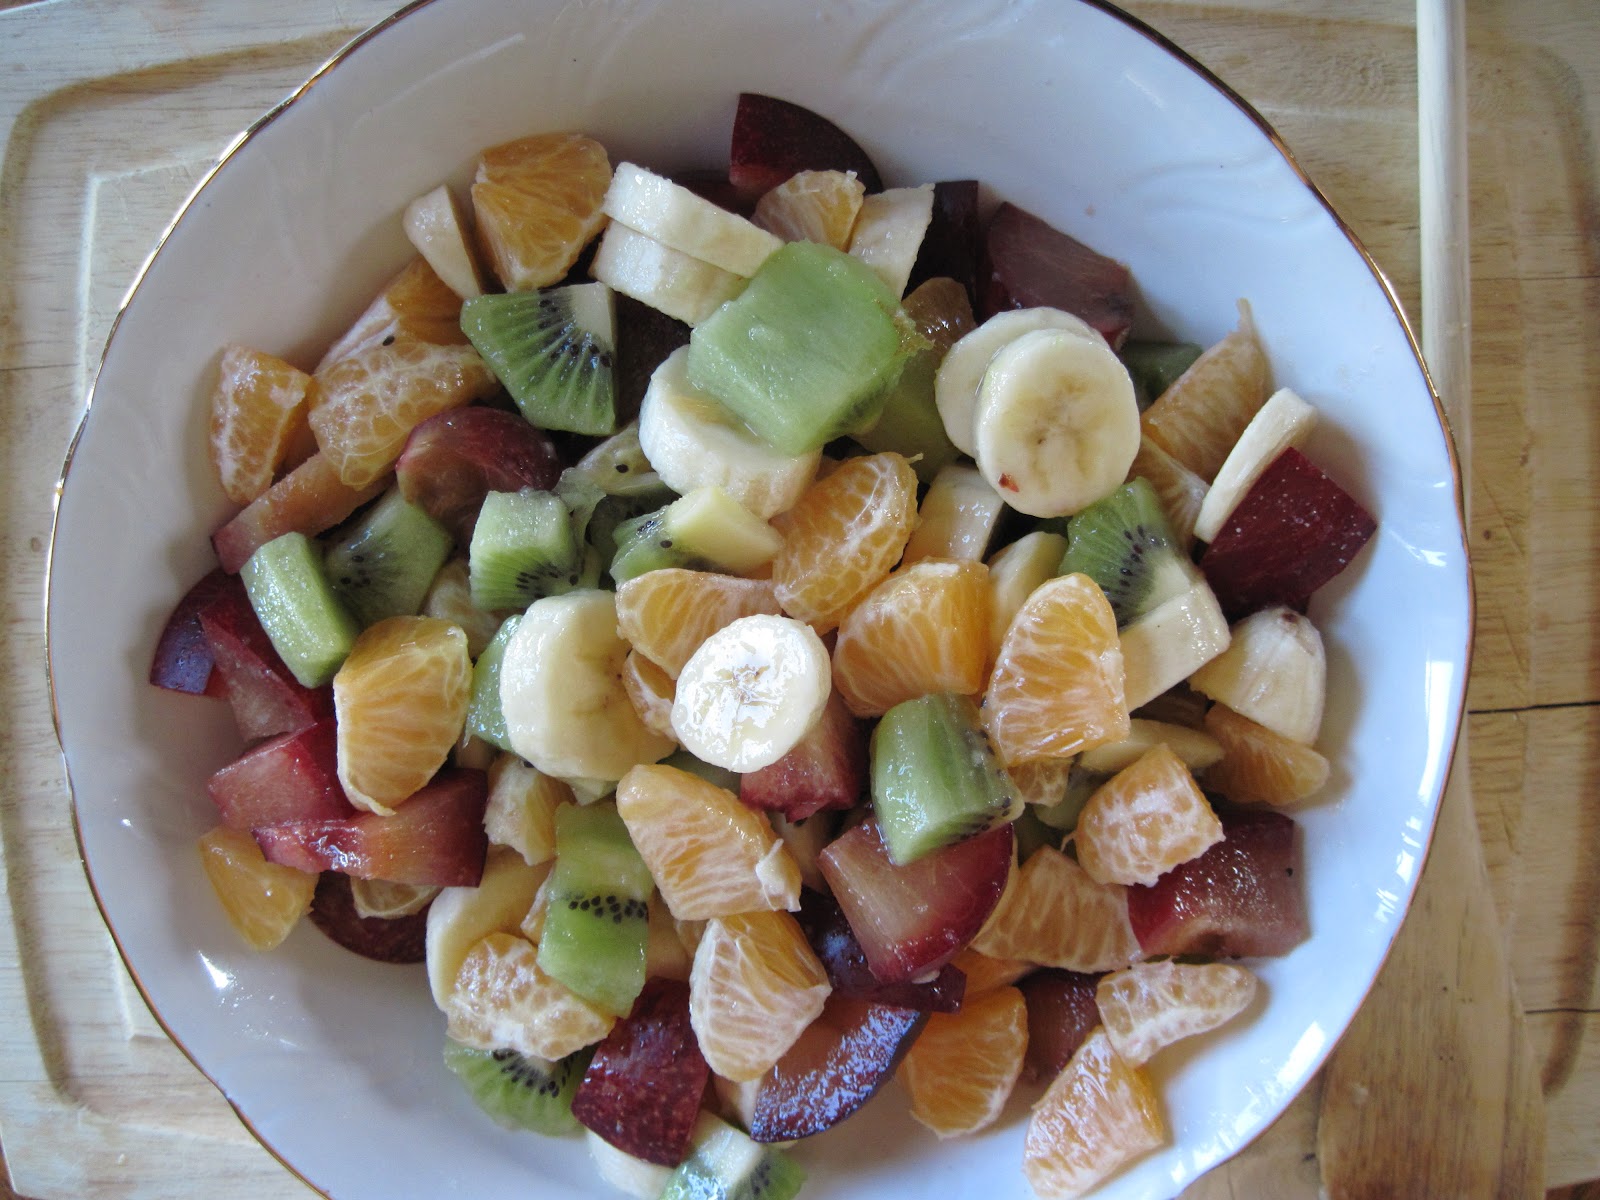
Fruit Salad with Plum, Madarin, Kiwi & Banana

Tired of the cold grey weather already?  Christmas sweets and comforts foods got you down?  Then make fruit salad!  This is so simple and quick to make.  Refresh yourself with a juicy salad that will brighten your day!

FRUIT SALAD
by Mum In Bloom

2 bananas
3 plums
3 kiwis
3 madarin oranges
lemon juice
sugar (or Truvia which is what I prefer)

Slice all the fruit into bite sized pieces, add a couple teaspoons of lemon (or lime or orange) juice, add sugar to taste and stir all together.

Yes, it's just that easy.

Printable Recipe

Happily submitted to Tastey Tuesdays over at A Beautiful Mess.
Enjoy!


from the book "The Rainbow Dictionary"
by Wendell W. Wright, PH.D.
Asssited by Helene Laird
Illustrations by Joseph Low
1959 The World Publishing Company

I purchased this beautiful book at an auction for pennies!

Friday, September 17, 2010

Recipe: Amish Cook's Banana Muffins

These muffins are perfect for breakfast or snacks on the go.  They're moist, sweet, and dense with a golden crust.  We had these everyday for breakfast this week, and had enough to send one for the school bus driver each day.  I liked how long they lasted in the cookie jar, as my Banana Oat Mini Muffins need to be eaten within a few short days.

This delightful recipe comes from one of my new cookbooks "The Amish Cook's Baking Book" which is filled with back-to-basics baking, and gorgeous photography.  Each recipe is simple, and the book includes a section for Children's Baking.  Our daughter is old enough now to try a few recipes on her own and this book would provide a good start.

HOMEMADE BANANA MUFFINS
from The Amish Cook's Baking Book

2 teaspoons baking powder
1 teaspoon salt
1/2 teaspoon baking soda
1/2 teaspoon ground nutmeg
2 cups all-purpose flour
1/4 cup vegetable oil
1 large egg, slightly beaten
1/3 cup skim milk
1 cup mashed ripe bananas
1/2 cup granulated sugar
1/4 cup packed brown sugar

Preheat the oven to 375 degrees.  Grease and lightly flour 12 muffin cups or line with paper baking cups.
I made a double batch.  Just rotate trays halfway through baking.

In a large bowl, stir together the baking powder, salt, baking soda, and nutmeg until evenly blended.  Add all the remaining ingredients, mixing only until the dry particles are moistened.  Fill the prepared muffin cups 2/3 full and bake until golden brown, 20 to 25 minutes.

Printable Recipe

Happily submitted to
Family Friendly Fridays over at Mommie Cooks!
Frugal Fridays over at Life As Mom
Cookbook Sundays over at Brenda's Canadian Kitchen

Enjoy!

Wednesday, June 23, 2010

Recipe: Banana Chocolate Coffee Cake (aka Mexican Monkey Cake)

While searching for a recipe to use up 3 ripe bananas, I came across this lovely cake on Farmgirl Fare.  It's called Mexican Monkey Cake but tastes like a coffee cake which is why I renamed it.  The banana flavour tastes wonderful with the chocolate, along with the added crunch from the nutty streusel topping.  My kids (and neighbour) absolutely loved this cake.

BANANA CHOCOLATE COFFEE CAKE
from Farmgirl Fare

1-1/2 cups semi-sweet chocolate chips
2/3 cup (packed) golden brown sugar
2/3 cup chopped walnuts (optional)
2 teaspoons ground cinnamon (I use Saigon Cinnamon)
1/2 cup (1 stick/4 ounces) butter, softened (or 1/2 cup trans-fat free margarine, such as Earth Balance)
3/4 cup granulated sugar
1 large egg
1-1/4 cups mashed, very ripe bananas (they cannot be too ripe)
2 Tablespoons yogurt or sour cream (I used plain yogurt)
1 Tablespoon milk
1-1/2 cups all-purpose flour
3/4 teaspoon baking soda
3/4 teaspoon baking powder
1/2 teaspoon salt

Heat oven to 350 degrees (325 if using a glass pan such as Pyrex). Grease an 8"x8"x2" baking pan. In a small bowl, combine chocolate chips, brown sugar, walnuts (if desired), and cinnamon; set aside.

In a large bowl, beat butter, sugar, and egg with an electric mixer until fluffy. Add bananas, yogurt, and milk, and mix well. On low speed, beat in flour, baking soda, baking powder, and salt just until blended.

Spread slightly more than half of the batter in the pan. Sprinkle with half of the cinnamon streusel. Carefully spread the remaining batter over the streusel and then top with the rest of the streusel. Bake until a toothpick inserted in the center of the cake comes out clean, about 40 to 50 minutes. Cool in pan on a wire rack. Serve warm or at room temperature.

This cake tastes even better the next day, and it freezes beautifully. You can freeze the cake whole or cut it into pieces, wrap them tightly in plastic, and place them in a zipper freezer bag.

Printable Recipe


Happily submitted to Works for Me Wednesday over at We Are THAT Family.
Enjoy!


from the book "Chicken Soup With Rice - A Book of Months"
written & illustrated by Maruice Sendak
1962, Harper & Collins

I got this book from our local library.

Sunday, June 20, 2010

Recipe: Banana Cinnamon Chip Bread

This bread was eaten by the kids and their friends so quick that I barely got a picture of it.  Like all banana breads it was easy to make, very moist, yet had a real kick of cinnamon from the chips.  What a nice flavour combination this was.

I found this recipe over at Recipe Girl. where her recipes and photography will inspire you.  She has lots of options for entertaining and a whole page dedicated to it.  She's also auditioning to host her own cooking show on Oprah and you can see her audition tape and vote here... (wait until you see her awsome kitchen!).

CINNAMON CHIP BANANA BREAD
from Recipe Girl

1½ cups mashed ripe bananas (3 to 4 medium)
¼ cup melted butter
1/3 cup granulated sugar
1/3 cup (packed) brown sugar
1 large egg, beaten
1 tsp vanilla extract
1½ cups all-purpose flour
1 tsp baking soda
½ tsp ground cinnamon
¼ tsp salt
handful of cinnamon baking chips (or any other kind of chips)

Preheat oven to 350°F. Butter 5×8-inch loaf pan.

Mix bananas, butter, sugars, egg and vanilla in medium bowl.

In a separate bowl, whisk together flour, baking soda, cinnamon, and salt. Add dry ingredients to wet and stir just until flour is incorporated. Stir in a handful of desired flavor of chips.

Pour into prepared loaf pan. Sprinkle a few more chips on top of the batter. Bake 50 to 60 minutes, or until toothpick inserted in the center comes out clean.

 Let cool in pan for 15 minutes, then turn out loaf onto rack to cool completely.  Yield: 1 loaf

Cooking Tips
*Sub 1/2 whole wheat flour if you’d like.
**Use any flavor chip that you wish, but the cinnamon chips are quite delicious!

Printable Recipe

Enjoy!


from the book "A Hole Is To Dig"
by Ruth Krauss
pictures by Maurice Sendak
1952, Harper & Row

Thursday, April 29, 2010

Recipe: Banana Crunch Muffins


Banana Crunch Muffins have lots of banana flavour with subtle crunch from the added granola.  This is a nice comination of flavours.  Our MOMS Club delivers meals to members who've just had a baby or are in need.  This week I delivered a breakfast tray to one of our moms.


The night before I made the muffins, I made some of Martha Stewart's Maple Granola.  I make this every week because we love it.  The next morning I made these easy Banana Crunch Muffins and added the granola.  I also cut-up a tray of fresh fruit and put some of the granola in a jar. 

I wanted to deliver an easy meal so the mom, husband and their toddler could nibble on it throughout the day.  With a new baby in the house, quick, easy, and healthful food is always a treat.

BANANA CRUNCH MUFFINS

from The Barefoot Contessa

3 cups all-purpose flour
2 cups sugar
2 teaspoons baking powder
1 teaspoon baking soda
1/2 teaspoon salt
1/2 pound (2 sticks) unsalted butter, melted and cooled
2 extra-large eggs
3/4 cup whole milk
2 teaspoons pure vanilla extract
1 cup mashed ripe bananas (2 bananas)
1 cup medium-diced ripe bananas (1 banana)
1 cup small-diced walnuts
1 cup granola
1 cup sweetened shredded coconut
Dried banana chips, granola, or shredded coconut, optional

Preheat the oven to 350°F.  Line 18 large muffin cups with paper liners (I used non-stick spray instead).

Sift the flour, sugar, baking powder, baking soda, and salt into the bowl of an electric mixer fitted with a paddle attachment. Add the melted butter and blend.

Combine the eggs, milk, vanilla, and mashed bananas, and add them to the flour-and-butter mixture. Scrape the bowl and blend well. Don’t overmix.

Fold the diced bananas, walnuts, granola, and coconut into the batter.

Spoon the batter into the paper liners, filling each one to the top. Top each muffin with dried banana chips, granola  (this was my topping), or coconut, if desired.

Bake for 25 to 30 minutes, or until the tops are brown and a toothpick comes out clean. Cool slightly (actually cool alot or the tops of the muffins will seperate from the bottoms when you flip the tray over - lesson learned), remove from the pan, and serve.

Printable Recipe
 
Enjoy!


from the book "Wind Song"
by Carl Sandburg
1960 Curtis Publishing Company

Wednesday, March 3, 2010

Recipe: Banana Nut Cookies-In-A-Jar

I'm participating in a benefit bake sale this week and didn't want to spend the week baking.  Sounds strange, eh?  I bake so much on a regular basis that anything extra just becomes a chore.  So, I decided to get creative and come up with something that would work and not take up so much time.  What I found was many recipes for "gifts in a jar".  You can do this with all sorts of cookie, brownie, cake and soup recipes.  A simple internet search will turn up dozens of hits.

I tried to look for something that was a bit out of the ordinary and gift-worthy.  My hope is to charge $5/piece for these to raise as much funds as possible.  All the money raised from our sale is going to benefit our local library's children's programs and our local Big Brothers/Big Sisters.  I found this Banana Nut Cookies In A Jar Recipe at http://www.best-cookie-jar-recipes.com/

These were so easy to make.  I had a bunch of 1-quart jars that (I purchased from our local thrift shop for 50 cents each!) so all I needed to buy were the lids.  I sterilized them by running them through my dishwasher and used the heat-dry cycle, then sterilized the lids in simmering water.  After drying thoroughly, I started adding the ingredients in layers using a handmade funnel made out of card stock.

To decorate them I made an instruction tag using a label from a beautiful site A Print A Day.  I downloaded it, then modified it to add the instructions.  I uploaded a copy of the tag I made which you can get here.  I tied each tag on using raffia and added a gift tag that I downloaded for free from Land O Lakes (you'll have to sign-up to their website to get it).

I made a batch of these cookies and they are truely gift-worthy.  They are nutty and moist with lots of banana flavour.  I like that you only use a heaping teaspoon for each cookie as it keeps them small and the perfect size for adult kid snacks.


BANANA NUT COOKIES IN A JAR

from www.best-cookie-jar-recipes.com

Ingedients for Jar:
1 1/2 cups flour
1 teaspoon baking powder
1/4 teaspoon baking soda
1/2 teaspoon salt
1 cup sugar
1 teaspoon cinnamon
1/4 teaspoon nutmeg
1 1/2 cups quick cooking oats
1/3 cup finely chopped walnuts

Instructions for Jar:
In small bowl, combine flour with baking powder, baking soda and salt. Mix well. Spoon into 1-quart jar and press down.

In another bowl, combine sugar with cinnamon and nutmeg. Stir until mixed and evenly colored. Pour sugar mixture over flour and even out the surface.

Add the oats on top of sugar, pressing down firmly. Pour nuts over oats and press down. Place lid on jar.

Instructions for Baking:
1/2 up (1 stick) butter, softened
2 eggs
1 cup mashed, ripe bananas

Preheat oven to 375 degrees.

Add butter or margarine, eggs and bananas. Beat on low speed or by hand to blend. Drop by heaping teaspoonfuls onto lightly greased cookie sheet.

Bake for 12 minutes. Remove from oven and let cookies cool on cookie sheet for 1 minute. Transfer to cooling rack. Makes 3 1/2 - 4 dozen.

Find a printable copy of this recipe here.


Enjoy!  Sarah


Happily submitted to Works for Me Wednesday, hosted this week by Rocks In My Dryer
"as Kristen from We Are THAT Family, is (as we speak!) en route to Kenya with Compassion International. Don't miss her trip updates at her blog--I know she's about to experience some powerful things."

Happily submitted to the Ultimate Recipe Swap over at Life As Mom where this week we're sharing our Favourite Flour Recipes.

Tuesday, February 2, 2010

Recipe: Honey-Banana Bread


I've been making alot of banana bread lately as I'm still cleaning out my freezer after participating in the Eat From the Pantry Challenge. We buy our banana's from Sam's Club in huge bunches as they're usually under $2/bunch. After they turn dark I freeze them and save them for baking. Needless to say, there was probably 4 bunches in my freezer to get used up.

I love this Honey-Banana Bread as it uses honey in lieu of sugar. Depending on how moist your banana's are will adjust your cooking time but it's usually 50-60 minutes in a 350 degree oven.


This recipe comes from the Southern Living 30 Years of Our Best Recipes cookbook which I purchased from an estate sale a few years ago. I love the recipes in the book and have tried many of them and flagged my favourites such as Garlic Shrimp, Lobster Newburg, Zucchini Bread.

HONEY-BANANA BREAD
1/2 cup butter or margarine, softened (I used organic salted butter)
3/4 cup honey (try to always use local honey)
2 large eggs
1 cups mashed ripe banana (about 2 bananas)
2 cups all-purpose flour

1 teaspoon baking soda
1/4 teaspoon salt (I skipped this as I used salted butter)
1 cup chopped pecans, toasted (I used chopped walnuts)

Beat butter at medium speed with an electric mixer in a large mixing bowl; add honey, beating well. Add eggs, 1 at a time, beating after each addition. Add banana and mix well.

Combine flour, baking soda, and salt; stir in pecans. Add to butter mixture, stirring just until dry ingredients are moistened.

Spoon batter into a lightly greased and floured 9x5" loafpan.

Bake at 350 degrees for 50 to 55 minutes or until a wooden pick inserted in center comes out clean. Shield with aluminum foil, if necessary. Cool in pan on wire rack 10 minutes; remove from pan, and cool completely on wire rack. Yield: 1 loaf.

Friday, January 22, 2010

Frugal Friday: My New KitchenAid Stand Mixer


Here she is! My beautiful new KitchenAid Stand Mixer!

I have dreamed about owning one of these for years! I've always enjoyed baking and have experienced a sore arm many times from using my hand-held mixer. I'd dread Bake Sales because of the amount of time it would take to prepare anything. And now... oh the possibilities!

This summer while visiting a friend, I spotted hers in the back of her kitchen hidden from view. Gasp! I said to her "Um, can I reorganize your kitchen a bit?". How bold of me, but she thought it was great! So, the first thing I moved was her mixer to the front-and-center of the kitchen. Ahh, now that's much better ;o) She's been doing lots of baking ever since, and I got a lovely loaf of banana bread her 8 year old daughter made using it.

Why didn't I have one before now? Because they cost a fortune! I just couldn't imagine or justify spending that much on a kitchen gadget.

For Christmas my darling hubby knew I wanted one. With so many options to choose from he was a bit overwhelmed so gave me a check for one instead. He knew I could swing a deal on just about anything ;o) So, I went to Macy's, selected one, and simply couldn't walk out of the store paying the full price of $300!

Then, I turned to my trusty deal-getter Craig's List! There's always someone selling their stand mixer on Craig's List. I saw lots advertised as NIB (new in box) but I didn't trust that they weren't stolen from somewhere. Prices for mixers on Craig's List ranged from $140 to $300. I wanted an odd colour though - cobalt blue - to go with my kitchen. So, I waited. Our local Walmart had 4 Quart White mixers for $199, Sam's Club $270 for White or Black, Amazon.com $290 for the Cobalt Blue. But, I waited and was patient. Taking my time until I saw what I wanted on Craig's List.

Then, there it was for $200 the exact colour and model I wanted. But it was over an hour's drive away. So I sent an email asking if they'd meet me halfway. Whoo-hoo! They said yes and now I have it! For only $200 with the beater, whip, hook, and grinder attachments!

It's been on my counter for over 2 weeks now as I was scared to death to use it! What if it doesn't work! What if I break it? So, last night I finally broke down and made a banana cake using this lovely recipe from Pamela Donnis and it worked great!

This mixer is going to have me baking my face off! I can see it now, cookies by the dozens, cakes for birthdays, sweets for the teachers, I'll be bringing baked goods to everything!

Now that I have my heart fluttering just talking about it.. I must finish my post and go bake something ;o) Happily submitted to Frugal Friday over at Life As Mom.

Oh, and go check out your local Craig's List. Always meet the buyer in a public place and enjoy the sweet deals!
Related Posts with Thumbnails