Monday, November 30, 2009

Recipe: Curried Chicken Fricassee


After all that turkey and comfort food we've been having lately, this dish was a nice change of pace. It smelled wooonnddeerrffuull while it was cooking and was delicious! This is my own modified version of a recipe I found in a magazine (I modified it so much that I guess I can call it my own!).


CURRIED CHICKEN FRICASSEE

8 chicken thighs (about 2.5 pounds), with skin, bones in

1/2 tsp. coarse salt

1/4 tsp. freshly ground black pepper

2 Tbsp. extra virgin olive oil

1 Tbsp. curry powder

2 tsp. Tastefully Simple Green Tea Peppercorns

1-1/2 Tbsp. fresh rosemary, chopped

1-1/2 Tbsp. fresh thyme, chopped

3 medium onions, chopped

5 cloves garlic, crushed

1 cup white wine

4 cups chicken broth

8 oz. frozen petite peas

Serve over brown rice


1. Wipe the chicken thighs dry; season with salt and black pepper. Heat olive oil in a deep stockpot or Dutch oven over medium-high heat. Place chicken (skin iside down) in the pot and cook 6 to 8 minutes, until skin is golden brown. The chicken will give off a lot of it's own fat. Add curry power, green tea peppercorns, and herbs sprinkling evenly over chicken. Stir it around to mix it up.


2. Turn chicken with tongs and continue cooking. Scrap bottom of pot with wooden spoon to loosen the skin off the bottom if it's stuck. After 5 minutes, add onions and continue cooking about 4 minutes, stirring occasionally. Deglaze the pan by adding garlic and wine just enough time to lose its acidity. Add enough broth to cover the chicken, about 4 cups. Bring to a boil over medium-high heat, then cover the pot and reduce heat to a simmer.


3. Cook slowly, 1-1/2 hours. Prepare rice (I used organic brown long-grain rice which takes 40 minutes). Cook peas and set aside.


4. Remove chicken and keep warm. Reduce the sauce over high heat until thickened (10 to 12 minutes), season to taste, (hubby suggested I add a bit of corn starch next time to thicken the sauce). Layer rice, then peas, then chicken, then sauce and enjoy!


Wednesday, November 25, 2009

Happy Thanksgiving

Happy Thanksgiving Everyone! This is a picture of our fest a couple years ago.


Our family will be travelling to visit our closest relatives this holiday. We're thankful to have family close enough to drive to as my family is over 4000 miles away and husband's 2000. It can be tough living away from your mom, dad, siblings, and cousins but this is where life (and my husband's job) has placed us. I am thankful that he is still employed in this tough economy and see the effects of it all around me in our community.


I found a beautiful Thanksgiving Prayer to share which is from The Lutheran Church - Missouri Synod website.

This morning I asked our daughter to make a list of what she's thankful for (I typed it as she wrote it, spelling mishaps and all ;o)

I am thankful for...

My family, My cosins, My voice, halloween, dressing up, My friend's, My dog, Christmas, gifts, My hose, My little brother, My playhose, My blow up slide, and our freedom.

I hope you all have a safe and blessed Thanksgiving holiday.

Tuesday, November 24, 2009

Recipe: Coconut Snowballs


Our daughter had 4 friends over on Saturday so I needed to find something to keep them busy and the girl drama down! So, I put them to work baking Christmas cookies.
I am a big believer in hosting playdates for our daughter. It's great to have her friends over and get to know them. Each girl is different and special in her own way. She has her friend who's funny, sporty, crafty, and motherly. It's nice to know they're all safe here, and I get to listen to what's going on in their lives.. either through them telling me or through hearing them play.
Kids play out what they're experiencing so hearing them play gives a priceless glimpse into their lives like what their excited about or what's bothering them. We find lots of opportunity to discuss being a good friend to one another and what it means to be a good friend.


Now for the great recipe I found in Family Circle's Nov 29 '08 magazine! I love this magazine's articles and recipes. I'm a magazine nut and have piles by my computer. When our library is cleaning out old issues I take them home, read them, then pass them on to our adopted soldier serving in Iraq or to other friends.

These cookies literally melt in your mouth. I was never a big fan of coconut but the coconut in these cookies isn't overpowering. They're like a buttery shortbread ball cookie with frosting and a bit chewy. I'll be mailing these to all my family in Canada this week when I send their presents. What a wonderful time of year!


Find a link to the recipe here.

Coconut Snowballs
From Family Circle Magazine Nov.29.2008
Makes: 2 doxen
Bake: 350 for 15 minutes

1 cup sweetened flake coconut
1 cup all-purpose flour
1-1/4 cups cofectionrs' sugar
pinch salt
6 Tablespoons (3/4 stick of butter) unsalted butter, softened
1 teaspoon vanilla extract
4 teaspoons milk
1. Grind 1/2 cup of the coconut in food processor. Chop remaining coconut and set aside. Add flour, 1/4 cup of the confectioners' sugar and the salt. Pulse to blend. Add butter and vanilla pulse until dough comes together.

2. Heat oven to 350. Roll dough into 1-inch balls. Place dough balls 1 inch apart on an ungreased baking sheet.

3. Bake cookies until firm but tender, 15 minutes. Remove to rack; let cool completely.

4. In small bowl, stir together remaining 1 cup confectioners' sugar and enough milk until smooth but still thick. Dip cookies in glaze (about 1/2 teaspoon for each), letting it drip down sides. Dip in chopped coconut and set aside for glaze to dry.

Per cookie: 89 calories; 4 g fat (3 g saturated); 12 g carbs


Happily submitted to Tasty Tuesday over at In Passionate Pursuit. She's posting live from South America today where they're picking up her new nephew! What a wonderful blessing!

Friday, November 20, 2009

Frugal Friday: Holiday Movie & TV Show Listings


Watching holiday movies is a tradition in our home. Once our family flys in for Christmas we watch a movie almost every evening after supper. Last year we watched everything from John Adams, A Christmas Story to ET! This year I'm hoping to find more Christmas themed movies.

I was searching around the internet today (using Swagbucks but I'll post about that later) searching for Holiday TV Movie Schedules. Specifically, I was looking for when the Amercian Girl movies will be on Hallmark Channel. I came across this amazing site "Its A Wonderful Movie" with all listings Holiday shows and movies. It includes reviews, links, descriptions of shows and loads more. What a great site to refer to when you plan on cuddling up with your family to watch holiday shows.

Happily submitted to Frugal Fridays where everyone's submitting their ideas for Planning Christmas on a Budget over at Life As Mom.

Thursday, November 19, 2009

Recipe: Turkey Pumpkin Chili


This Turkey Pumpkin Chili was so delicious and easy to make. It's also packed with vitamins!

I made this for a pumpkin carving party we were supposed to have last month but the party got rained out. So, I froze the huge pot full of chili into individual Ziplock bags and froze it for later. It reheats beautifully and tastes even better! A friend of mine came for lunch last week and she ate two bowls then made it for supper that same night!

The Whole Foods Website is full of wonderful, delicious, easy and nutricious recipies.

Whole Foods Turkey Pumpkin Chili recipe here.

Happily submitted to the Ultimate Recipe Swap at Life As Mom. See the swap links today for lots of Thanksgiving Inspiration!

Wednesday, November 18, 2009

Recipe: Homemade Granola Bars


This recipe is from one of my favourite homemaking blogs that I love to read Home Joys. All of Gina's recipes are simple, nutritious, and made from scratch.


My only tips with this Granola Bar recipe would be to let the bars cool half way before cutting them, let them cool almost completely then take them out of the pan to cool on a rack. I added 1/2 cup raisins and 1/2 cup dark choc chips for some added sweetness. Great snack or for lunch boxes!


2 1/4 cup rolled oats
1 cup sunflower seeds
1 1/4 cup chopped peanuts

Toast oats, seeds, and nuts in 400 degree oven for 10-15 minutes. Check every few minutes and stir them around. You don't want them to burn, only to slightly brown.

2/3 cup honey
1/2 cup brown sugar
2 T butter
2 tsp vanilla
1/2 tsp salt

Melt honey, sugar, butter, vanilla, and salt in pan over medium heat. Simmer for about five minutes.

1 cup raisins

Pour sugar syrup over toasted ingredients and raisins. Stir well. Press into greased 9 x 13 glass pan. Carefully press mixture tightly. Cut into bars while still warm.

Options:
Instead of the sunflower seeds, peanuts, and raisins, you may substitute from this list.

walnuts
almonds
coconut
craisins
chocolate chips (allow to cool slightly before mixing in, or will melt, which tastes good anyway!)
wheat germ
flax seed

Tuesday, November 17, 2009

Parenting: I forgot to be the Tooth Fairy!


Oh my! I'm sure we've had moments like this as parents but it's terrible when it happens to you. I forgot to be the magical Tooth Fairy and collect my daughter's newly lost tooth and place money for it under her pillow.

It's been at least 2 years since she's lost a tooth, she's 8 now and soon the magic of the Tooth Fairy will be long gone. She was sooo excited about her lost tooth and waited with delight for her prize from the Tooth Fairy. She still asks what happens to the teeth she collects and listens with wonder as Daddy weaves a tale of fantasy houses built with baby teeth or her old baby teeth placed in the mouth of a new baby.

So she went to bed, filled with visions of a beautiful Tooth Fairy decending upon her room, then woke up to nothing! Somehow the tooth got lost in her bed but - Mommy also forgot. In the morning we came up with a theory that the dog disturbed her work, baby brother walked in on her in his sleep and more. She went to school satisfied that the Tooth Fairy could complete her work that night.

That day I actually found the tooth while making the bed! I was going to place money under her pillow so that it would be there when she got home from school and FORGOT AGAIN! I wish I could say something important came up last minute that made me forget but it wasn't that... it just slipped my mind in the midst of my daily things-to-do.

After school she wrote the Tooth Fairy a letter and placed it under her pillow to explain the situation. I typed it below just as she wrote it and left out her name*.

To: Tooth Fairy
From: Daughter* (the girl sleeping in the bed)

I have a tooth that I lost. But I have lost it! My mom at first looked in my bed. She found it but she lost it again. I can prove I have a tooth becuse I sleep with my mouth open and you can see it. It is on the bottem row right in frount. You can move my lip if you want to.

Sincerley,
Daughter* (the girl sleeping in the bed)

Isn't she so cute! So, I finally remembered to put money under her pillow last night. I couldn't get the note from under her pillow without waking her - even though she left a place and pencil for the Tooth Fairy to write back.

I will do my best to NEVER forget such an important event again! I am grateful for the forgiveness and understanding of my daughter. Submitted to Gratituesday over at Heavenly Homemakers... go take a look at what others are grateful for!


Saturday, November 7, 2009

Recipe: Basic Bread Techniques


Baking your first loaf of bread can be intimidating. Previously, I wrote about a great no-knead brown batter bread, however, I also wanted to try "the real deal" from scratch. My bread maker was inconsistent with how the bread would turn out and it always seemed too spongy and fluffy for sandwhiches.

The recipe and tips below are detailed and easy to follow. I've made about 20 successful loaves so far so I thought the recipe was worth writing about. I received this recipe years ago from a community center when I lived in Toronto. I now make this recipe as our everyday bread every second day or so... it's that easy!


BASIC BREAD TECHNIQUES

Prepare yeast: Take the yeast you need for your recipe, and sprinkly it on top of war water (105-115F - just a little warmer than body temperature). Water which is too cold won't "wake up" the yeast, and water which is too hot will kill it. If it doesn't seem to be reacting to the water at all, it probably isn't OK to use. Some people add a little sweetener - what you want to avoid at this stage is salet, which will kill the yeast.

Mix the dough: There are several different ways to do this - a simple one which works is mixing together the liquids, using water which is quite warm, adding half the dry ingredients to get a soupy mix, adding the yeast, and then the rest of the dry ingredients, including the salt.


Knead: Put the flour in front of you on a well-floured board. Push down and away on it - use your whole body! Fold it in half, pulling the back over the front. Turn it a quarter and repeat. Keep the board floured - the dough will absorb it. Knead unti lthe dough is elastic, smooth, and a little shiny.

Rising: Put the kneaded dough into an oiled bowl. Cover it with a warm damp cloth and put it in a warm place away from drafts. Let it rise until about twice its original size. It's ready when it collapses quickly when you push into it.


Punch down: Turn the dough back onto the kneading board and push it down, kneading it again a few times.

Proof: Shape the dough into the right size for your pan. Put it in an oiled pan, and put the pan in a warm place and cover it lightly. Let the bread rise until it's about double in size - if it "overproofs" it will collapse or flow over the edges of the pan, and you have to punch it down again. When it is proofed enough gently push with a finger should leave a mark in the dough.

Bake: Put the bread in a preheated (usually 350) oven. It usually takes about 40 minutes to bake. It's done if it sounds hollow when you take it out of the pan and tap on the bottom. Turn it out of the pan and let it cool on the rack.


Basic White or Brown Bread


1/4 cup warm water
1 teaspoon yeast
1 cup hot water
1 tablespoon oil (I use canola)
1 tablespoon honey or sugar
3 cups flour (I use 2 white, 1 whole wheat)
1 teaspoon salt

Put the warm water in a small bowl and spinkle the yeast on top. Put the hot water in a large bowl and add the oil and honey or sugar. Mix in 1 cup flour, then the yeast mix, then the rest of the flour and the salt.

Knead the mix on a floured board, then oil the bowl and put the dough back in. Let it rise in a warm place (I use the microwave) until it is about twice as big. Punch it down, put it in an oiled panand let it rise again. Bake it in a preheated 350 degree oven for about 40 minutes.

Let it cool on a wire rack completely, slice with an electric knife, and place in ziplock bag. Makes 1 loaf, lasts 3-4 days if kept in cool dark place like a bread box.


So, how about you? Do you have any favourite bread recipes? If so, link your recipe in the comments section below and I'll give it a try! Thanks for sharing :)


Thursday, November 5, 2009

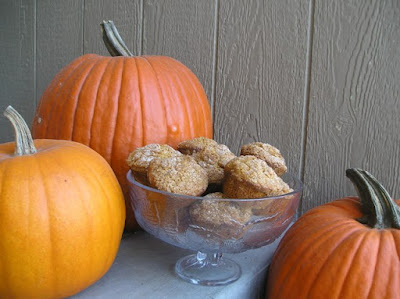
Recipe: Pumpkin Muffins


Oh boy these are delicious! They're moist, light and easy to make. Dear son got up extra early this morning so we decided to do some baking in our pajama's.

This recipe is from one of my most loved cook books "All New Complete Cooking Light Cookbook". I don't necessarily love the book because of it's light recipes but because there's lots of delicious recipes all through the book. I took a photo of how many recipes I've flagged as my favourites.

We doubled the recpie and it made 3 dozen muffins which left us lots to package as treats for friends. We have an elderly neighbour in need, a friend home with three children under 3 (one is a preemie so they can't go anywhere), and a teacher who's pregnant. I'm sure they'll all enjoy these goodies :)

I found a copy of the Pumpkin Muffin Recipe on a really great recipe site My Recipes.
Happily submitted to the Ultimate Recipe Swap at Life As Mom... check out everyone's tips on Make Ahead Meals this week!


Related Posts with Thumbnails